How to share your own Android library
A brief explanation of how to create an aar library and share it easily.
NOTE: I assume you already have some code that you want to share as a library. The intention of this article is to explain the steps to share the library not how to make it.
1. Create your library.
There are different ways to organize code you want to share. I prefer when the project is a demo application, and as a 'module' the code of the library you are sharing. I am going to explain this case.
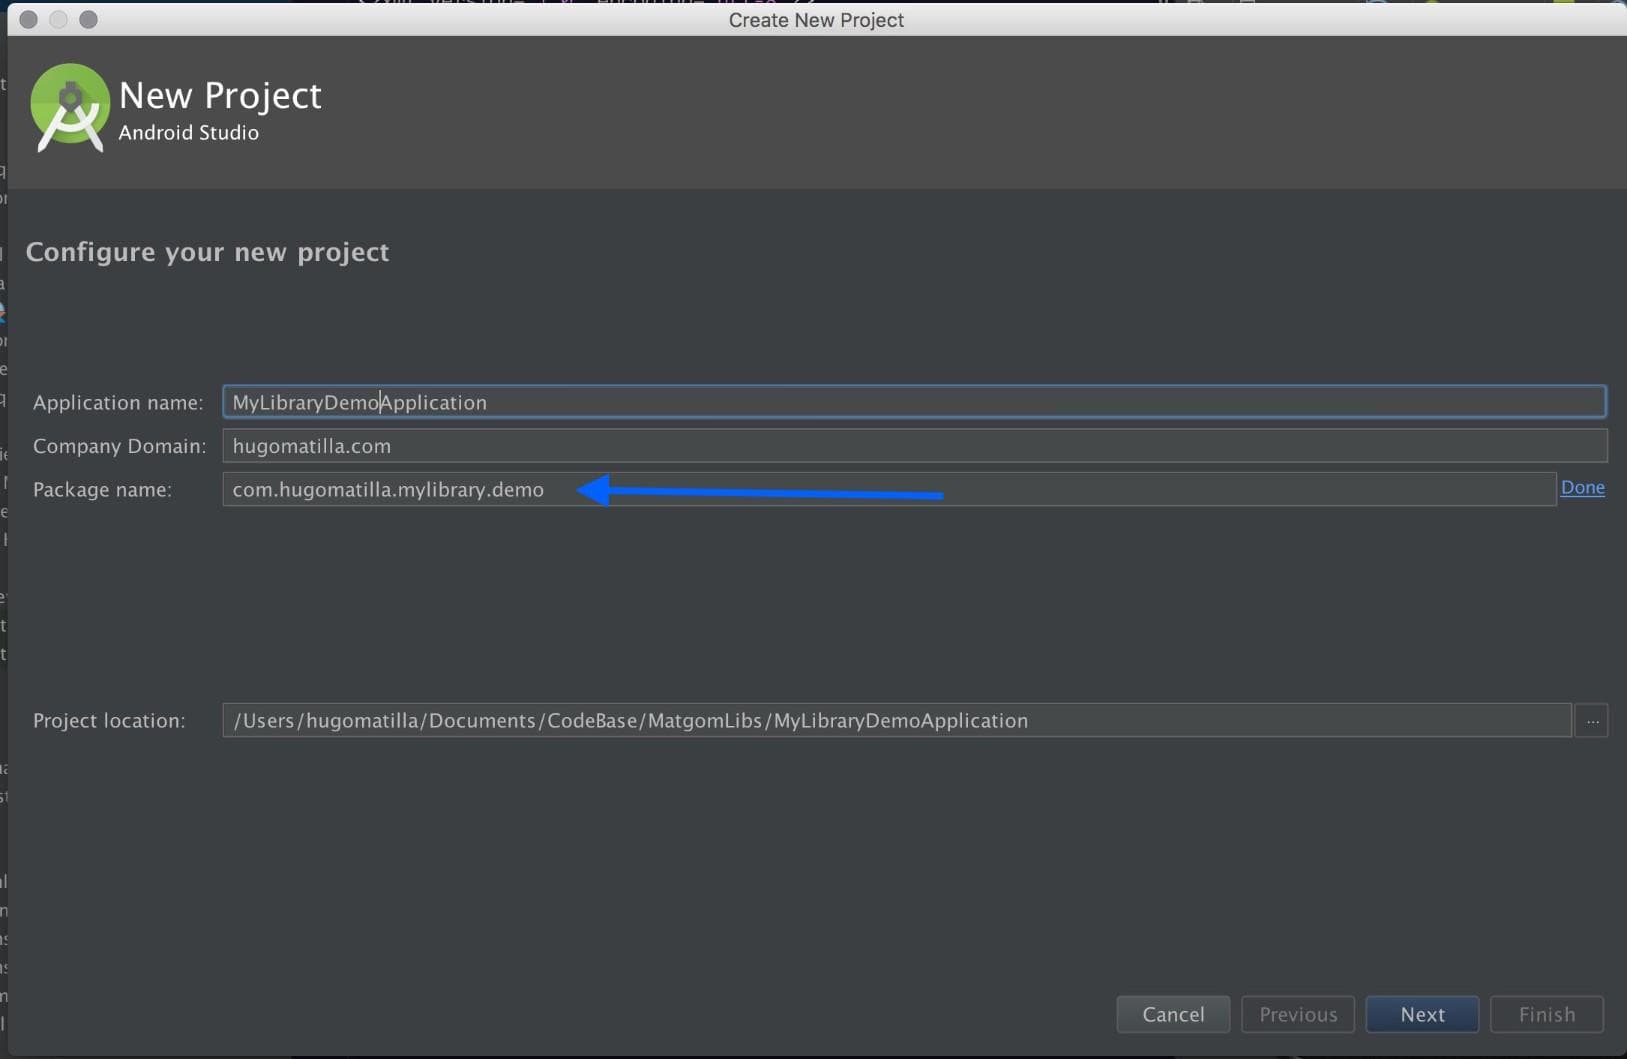
To do that create a new project and choose wisely the name and package name of the application. We are calling the application MyLibraryDemoApplication. We are editing the package name, think on the package name you want for your library first. In this case the library package name will be com.hugomatilla.mylibrary Adding a suffix give us a clean application package name com.hugomatilla.mylibrary.demo
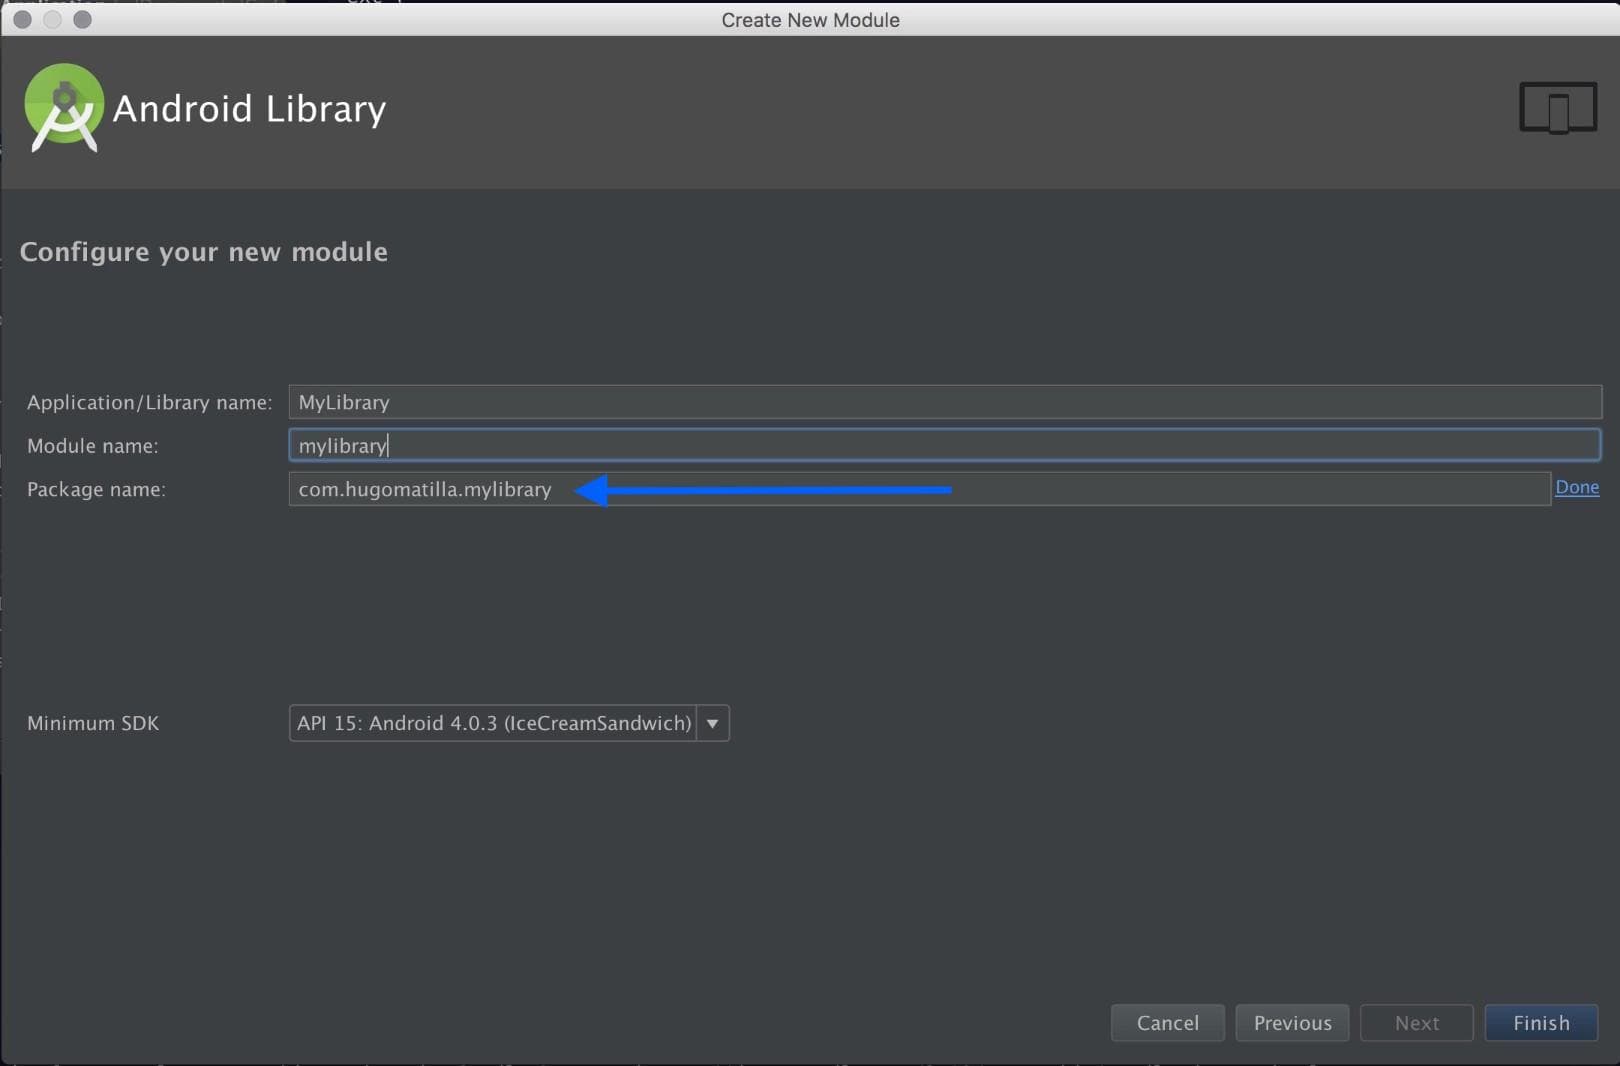
Now create a new module (Android Library) and change the name and the the package name. The package name is what the users of your library are going to see and use, keep it simple and concise. Here the name of the library will be MyLibrary and the package name the one we mention before. com.hugomatilla.mylibrary
These 2 simple steps will make the project cleaner, consistent and easier to use.
2. Create an aar file
This part is easier that you could expect, though it was not easy to find the correct article who explained it. I found this one very helpful.
How to Publish Your Android Studio Library to JCenter
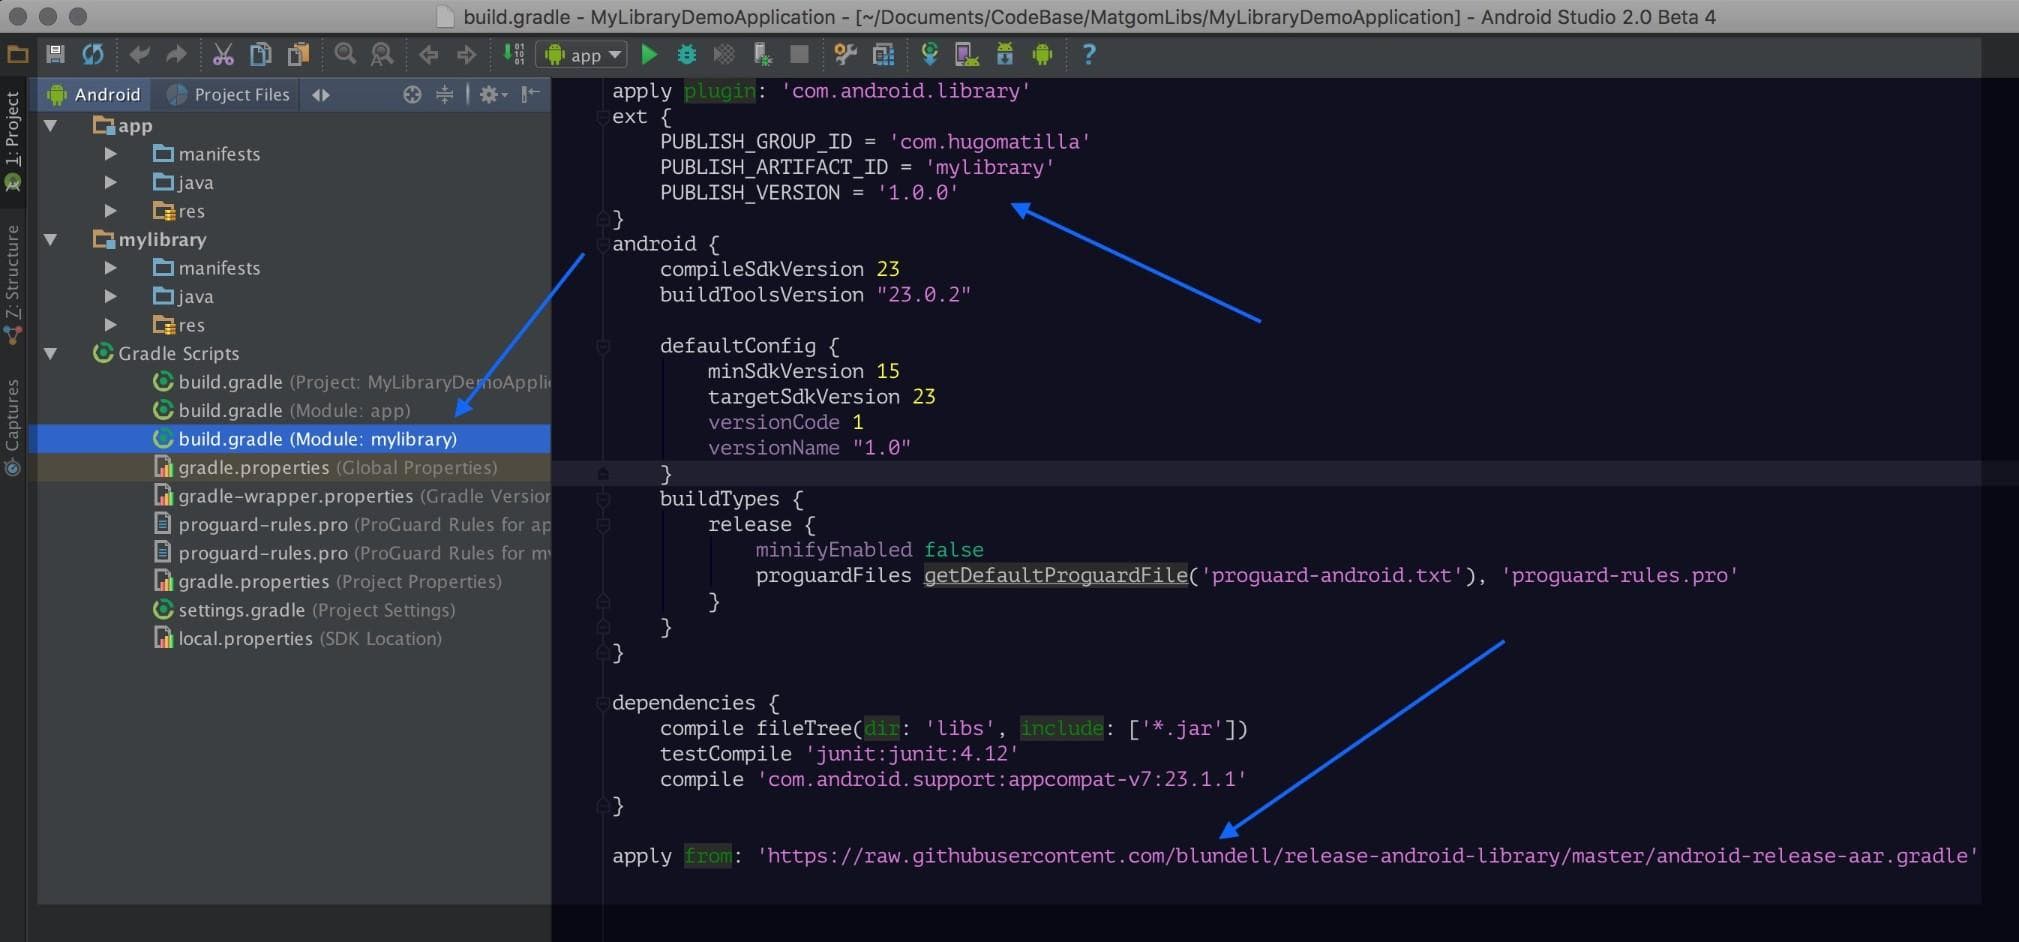
NOTE: Go to the build.gradle of your library module, the first thing you see in the first line is apply plugin: 'com.android.library'. That means that it is defined as a library instead of an application. Because of that, in every time you build the project, you will get an aar file per build variant in the folder mylibrary/build/outputs/aar/. You could use this files as your aar library files, but they won't have a version code. Follow next steps to add version numbers using maven.
Add this at the top after the apply call in the build.gradle of your library module.
ext {
    PUBLISH_GROUP_ID = 'com.hugomatilla' //Change this to your own domain
    PUBLISH_ARTIFACT_ID = 'mylibrary' //Change this to the name of your library
    PUBLISH_VERSION = '1.0.0' // Version code you want. 1.0.0 is a good start
}
And this at the end.
apply from: 'https://raw.githubusercontent.com/blundell/release-android-library/master/android-release-aar.gradle'This is a definition of the gradle tasks needed to create your aar file.You can go directly to the website and see what is done. https://raw.githubusercontent.com/blundell/release-android-library/master/android-release-aar.gradle
Now sync the project and go to the root folder of your project, (not the library, the main project) and run gradlew
./gradlew clean build generateReleaseNow you have your aar file in yourAppFolder/yourLibrary/build/release.zip.
3.Test the aar library
Before publishing it is, a good practice that you test the aar library in your own project.
Unzip the file somewhere else in your computer and localize the aar file, in this case mylibrary-1.0.0.aar.
Create a new project (MyLibraryAARTestApplication) and copy what you used to test it in first place (the code in your MyLibraryDemoApplication).
Add the aar file to the project.
Go to the project view and select "Project" normally it is set to "Android". In project, go to app and copy the aar file to the libs folder.

Now add a reference in the dependencies and repositories in the build.gradle file and sync it.
repositories {
  ...
  flatDir {
    dirs 'libs'
  }
}

dependencies {
	...
    compile(name: 'mylibrary', ext: 'aar')
}
And add
At this moment if you run MyLibraryAARTestApplication and the aar file was generated correctly it should work as well as in MyLibraryDemoApplication
4. Upload to JCenter
Use bintray as mentioned in How to Publish Your Android Studio Library to JCenter Is a straightforward process easy to follow.
Just in case the above mentioned article dissapear I summarize the steps to follow.
- Create a New Maven Repository
- Create a New Package
- Create a New Version
- Upload the aar file. Search for the "upload files" button.
- Check the box "Exploding this archive"
- In the project page click on "link to JCenter".
- Wait until approval
Once you got the email telling you that the the project is uploaded to the JCenter, go to the test project ( MyLibraryAARTestApplication) and substitute the reference of the local aar file to the JCenter reference and see how the project works using your library from the server instead of locally.
compile 'com.hugomatilla:mylibrary:1.0.0'Now you can add this reference to your readme file so people who want to use your library can do it easily.
Extra point. Add it to Awesome list
To make it easier for the people to find your awesome library, you can upload the project to Awesome Android or to any other awesome list if it is not an Android library.
First read and follow the contribution guidelines when you have read them, follow these steps to create a pull request to the library.
- Fork the Awesome Android project
- Clone your fork to your computer. I use SourceTree git client, but you can use other clients like the Github client or the command line.
- Create a new branch with the name of the library.
- Add your library to the README.md file.
- Add a message following the contribution guidelines and commit your changes.
- And now create a pull request. In SourceTree, just right click in the master branch and click "Create a Pull request". It will open a github page showing you the pull request. Select the master branch as destiny and your branch as source. (It will be automatically set.)
- Click OK and wait for the approval. :)
Conclusion
At the beginning I thought it would be more difficult to set up everything, but as you see there are not so many steps, and they are quite simple. Choose well the project name and package name, run the gradle tasks, test the aar file before uploading to JCenter and make it more visible adding it to Awesome lists.